A new case study
I have played around with Linux for about 20 years, and I am constantly amazed by its ability to make simple things hard
Why? Well, I tell myself it's money, but in truth it is more about the achievement of making things. Maybe it is a holdover from the days men went to kill woolly mammoths, but that feeling of overcoming obstacles feels great, even if the end product is not as slick as a bought product.
Unfortunately (or maybe fortunately), installing anything with Linux will have issues. Some things procedures have been smoothed out over the years, but the more you dive into it, the more issues you will hit.
It's not as if, however, there is no advice. In fact, it is the opposite. There is far too much, but many of them are badly written assuming some critical knowledge or out of date dealing with legacy software etc.
However, as Mission Impossible says, "Your mission, should you choose to accept it..". Start the theme music now
The challenge
For example, a few years ago, I decided to make my own NAS box. It consisted of a Raspberry Pi 3 and 2 SSD hard disks. Not groundbreaking stuff, but I installed a open source media manager on it, OMV and it worked. It allowed me to create 2 backups of photos for a number of years. However, for months it has slowly stopped working, and the problem seems to be based on the software disk, a micro SD card, getting more and more disk errors.
The easy solution for this would be to reinstall the operating system and OMV, but the truth is for a device designed to operate 24/7, micro SD cards are pretty poor choices. All flash devices have what is called maximum read/write cycles. Basically, each bit on a memory card can only be written a certain number of time. Cards get away with it by a) not being written to very often and b) having software that moves the writes around to unused areas. That is why on say a camera, this is unlikely to be a problem. You don't often write to it, and often don't max out the card/
An operating system, like Linux, however, is different. It will often write to the disk, maybe thousands of times, and this may result in the disk wearing out. Micro SD cards are just not designed for this level of abuse, but when I did my NAS, that was all I had.
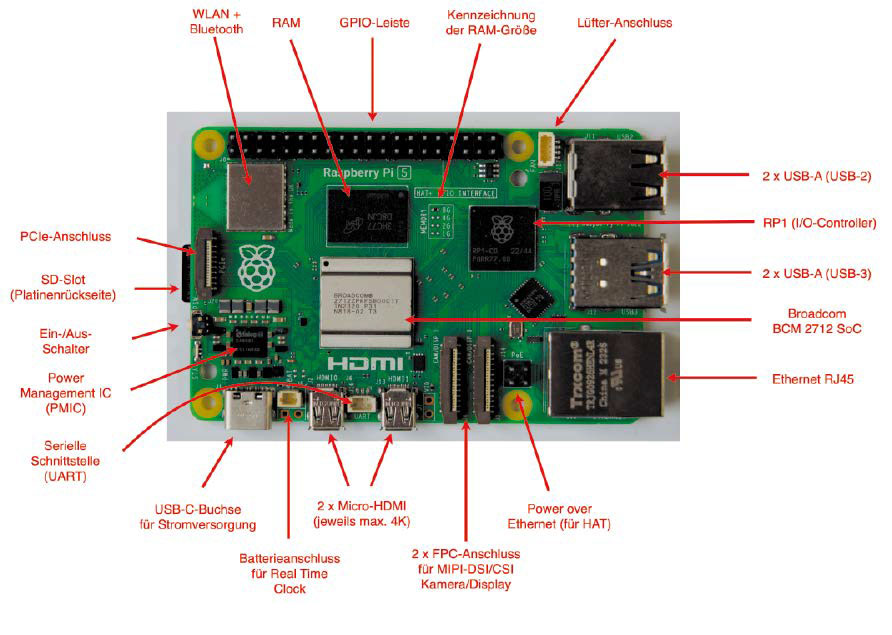
However, with the Raspberry Pi 5, that has changed. These now support something called M.2 disks. These are also solid state disks, but tend to be larger (so more space to move blocks around), and more robust. Most PC's now use them, so they have a good track record.
Therefore, I decide a whole update was required, which would be a Raspberry 5 with an M.2 disk attached.
First I needed a case..
The 2nd case
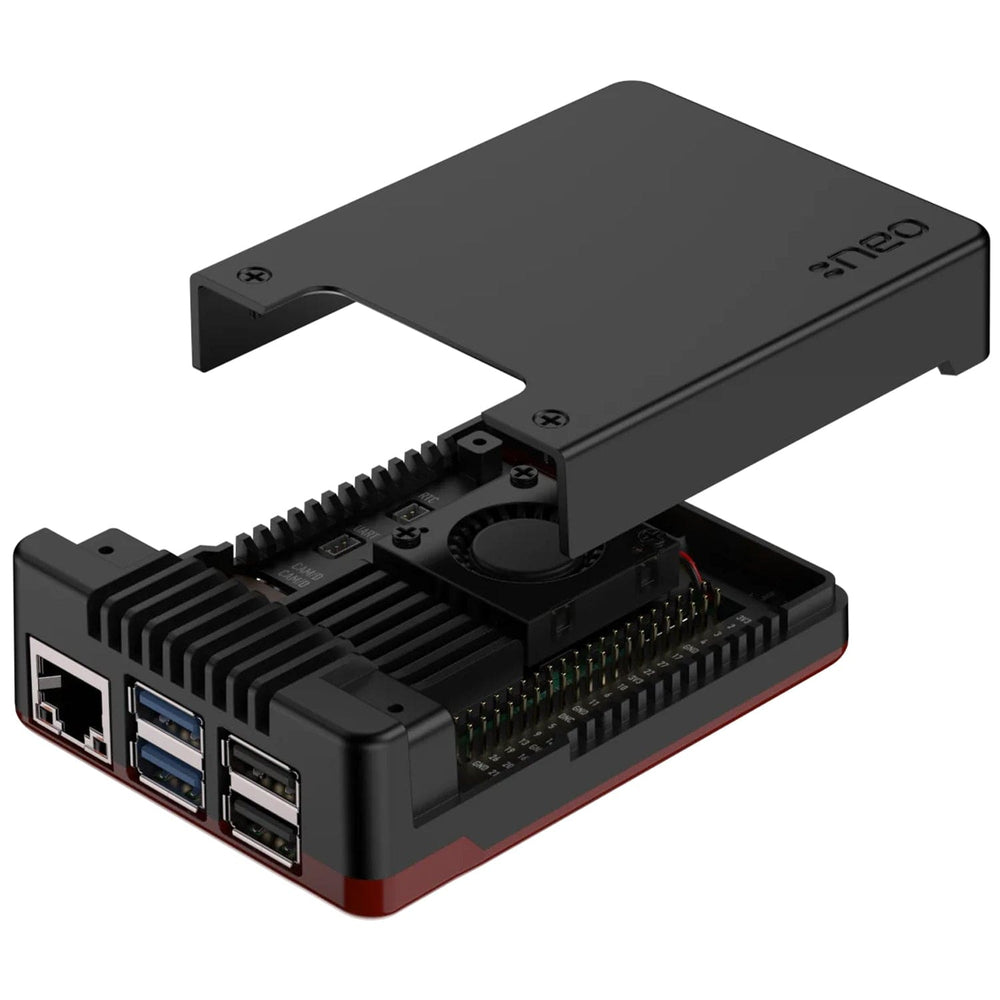
Strangely, considering the Pi is so ubiquitous and around for so long, cases tend to fall into 2 categories. Bad and abysmal. One company on the hand stands out and that is Argon. My original Pi, use an Argon 1 case and while not perfect, it was a head above any other case out there. It would fit a Pi 5 and anyway, Pi 5 are hot ships, so need better cooling. More importantly to fit a M.2 I needed an expansion board.
Fortunately, argon make just what I need with a Argon NEO 5. Not only will it fit a Pi 5, but also contains a fan and a M.2 Expansion board in a robust housing. All I needed to do was fit it...
I also needed a M.2 SSD. You would of thought any would do, but apparently you need to be careful that they are compatible. Since the Pi Hut recommended one was out, I bought the funkily named franxiana 512 GB one. Not that I need 512GB, but it was the smallest one I could find
Task 1
While the Argon cases are well-built, the instructions leave a bit to be desired. They come on the kind of size, you used to find in Christmas crackers. and I needed a magnifying glass to see the diagrams. Even then, I struggled to map the build instructions with reality
When you open the case box, you may be surprised to find no screws or other artefacts. This panicked me for a second, until I found them tucked in the case itself. You get the various case screws, heat sink material, rubber feet and two PCIe connector ribbons.
First job is to connect the fan. Raspberry, for whatever reason, hide the fan connectors under a removable plastic tab, making it hard to locate. Once located, the case fan cable is easy to attach, then you need to locate where the thermal pads go. Again it is not clear and there was a lot of comparing diagrams to pi pictures till I found they had to go on the Broadcom Chip and the power management chip cluster
Then the ribbon cable had to be connected to the Pi. This was not too bad, once we worked out how the ribbon tab worked. Then the Pi could be installed in thae case. This proved to be a real faff, since you have to position the fan cable correctly. It was never clear if I got that right and you feel a there could of been a better solution forv this.
However the real challenge was connecting the other end of the ribbon cable to the expansiob board. Again the tab function was not clear, but getting the right position and force to insert the cable took some time. My advice is to practice with the spare cable until you know what a inserted cable looks like.
All was left was to fold the bottom of the case and add 4 screws to fix it together. Well, that should of been the case (hah- Ed), but I could only get 3 screws to fit. Realizing that was enough, I gave up, but separate Pi fixing screws and case screws would of been useful.
Also the screws are small and black, so be careful with them. I managed to knock one on the floor and i spent 20 minutes locating it.
Also make sure the ribbon does not get caught in the case when closing it
Just add SSD
The next job was to add the M.2 SSD. This is added in a separate compartment at the bottom of the case. Again it requires removing 4 black, tiny, easily lost screws so be careful. The M.2 can then be inserted, but remember to remove the even smaller SSD retaining screw 1st. The M.2 needs a bit of force, but once added and screwed down, you are good to go.
However one word of warning. Even though, you will be using the M.2 SSD, you may want to boot initially from the micro SD slot. Therefore you will need to add formated and imaged SD card before shut the case. One of the poorer aspects of this case is that the SD card is not externally accessible.
Once done, you are good to go. One of my complaints of the Argon 1, was that it was hard to see the LED's. This one lights up the on/off switch, allowing you to easily see when its on.
All we need to do is add software. How hard can it be...


Comments
Post a Comment